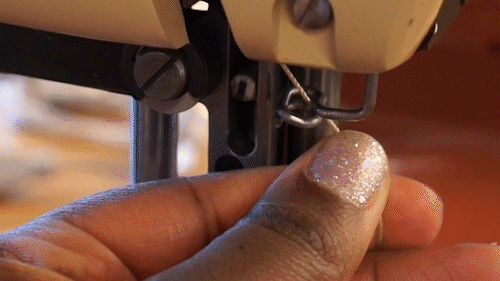
There’s nothing quite like pining over an expensive machine, finally getting it home, and being hit with the sudden realization that you don’t know how thread it. It’s a common problem and we’ve got the solution with our new videos to help you get started anew.
In three videos you will learn to thread a Cobra Class 20, Cobra Class 26 and a Cobra Class 3/Class 4.
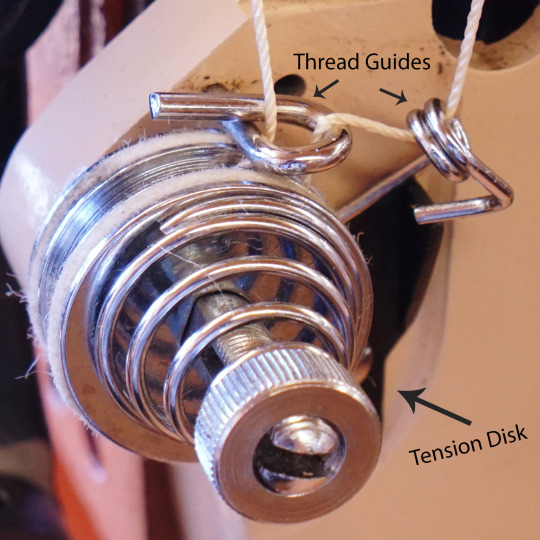
Just in case you find yourself a little lost, here is a bit of info on some of the terms you hear Rusty use.
Thread Guides – Thread guides make sure that the thread is always in the correct place. They are simple metal loops that make it difficult for the thread to lose its way. In case your thread does lose its way, the guides are made so that they can be put back in place without starting the threading process over.
Tension Disks – They are the metal coils on the machine. They work in conjunction with the thread guides to make sure the thread stays in place. Tension disks maintain enough tension so that thread does not become lax and is less likely to get caught or tangled.
Foot Press – The foot press referred to in the threading video is the smaller foot pedal on the bottom on the machine. This foot only lifts the needle. Be careful not to confuse this pedal with the gas which is the much larger pedal to the left.
If you want to learn more about buying leather sewing machines, getting started with them and even what thread sizes are best for the, visit our Machinery Index. It’s chock full of information on picking the right machine and even financing it!
At SLC, we embrace change as much as possible – it’s what keeps us afloat in an ever-changing economy and industry.
We have been putting more resources into our production work and, as you may already know, we’ve also acquired more space. With growing demand for production work and newfound space, we’ve decided to make some changes that we think will increase productivity and serve our customers.
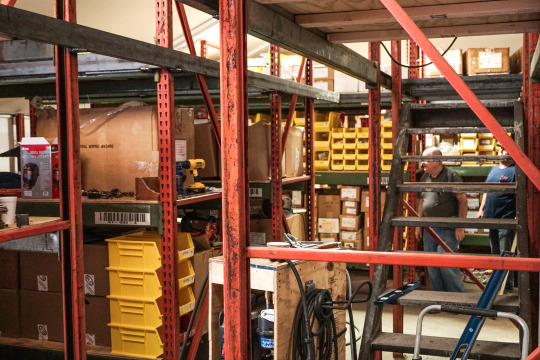
We are converting a seldom-used work area into a storage facility. This will come in handy when Kevin and Rusty jump at the next great deal.
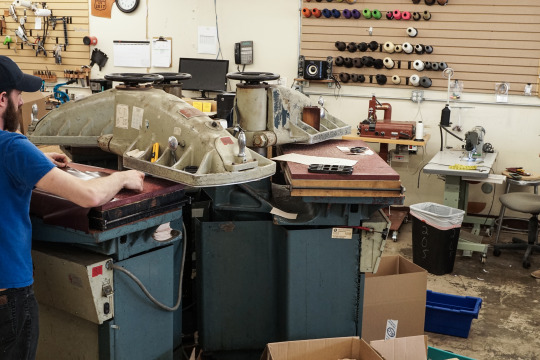
We have moved some of our production efforts over to Research and Development. Now we have more space for clickers! And boy, we love our leather shapes.
Denny and Clayton, from Research Development, are enjoying their expanded work areas in one of our former storage spaces.
There are more changes on the horizon, but we thought we’d let you know more about some of the things we’ve accomplished along the way!
That’s always a challenge. Oxalic acid is the best thing you can get for that. It’s a powder that you mix with water, that works great for cleaning. You can get it on our website for just $3.
We certainly do! We have all of our international orders go through this form (http://springfieldleather.com/international-orders) or have folks call in toll free at 800-668-8518. We do this to ensure that you get the lowest shipping available for your individual order! I recommend adding everything you want to your cart and using item numbers and quantities to share your order. Thank you for your interest!
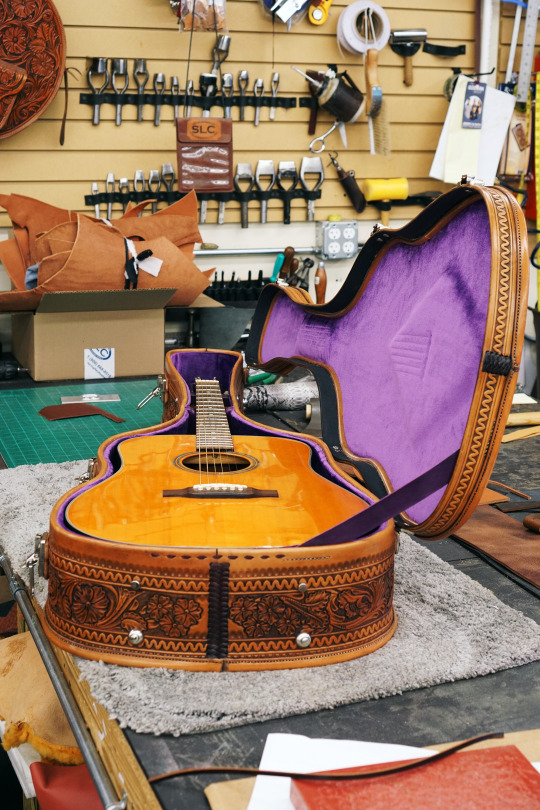
Part of the Springfield Leather Company philosophy has always been to learn through projects. When you’re getting started, you often need to follow the instruction of someone more seasoned through a pattern or a kit. Denny Lowe is our resident master craftsman and, with a little help, he creates nearly all of our new patterns and kits. His latest project is making a guitar case, a project he’s never tried before. Here’s a peek into his process.
Getting Started
Planning, pattern making, and cutting
To make a pattern, you first need a product. Denny finds it easiest to choose from what he’s most passionate about. “Most of the time my projects are picked for me,” Denny says. “[The rest of my projects] are things I have always wanted to do.”
He began the project by making a case for his own guitar. “I wanted to make sure I made one big enough to take almost any size guitar. I have a pretty big guitar myself so I made one to fit it.”
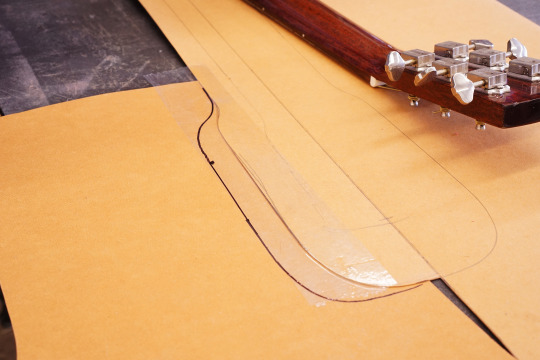
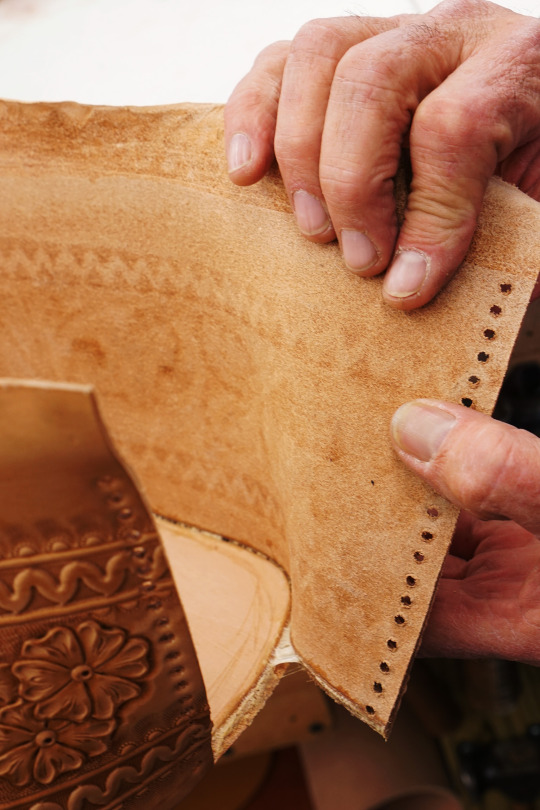
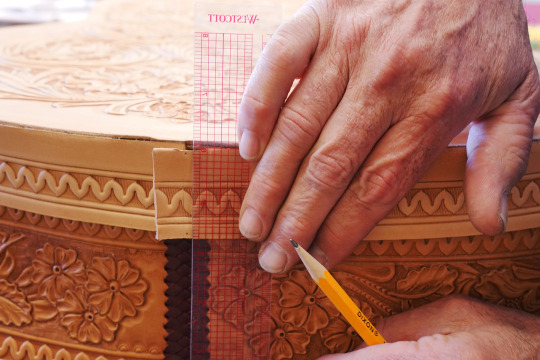
Once he had his base settled, it was time to begin the actual pattern. Using a pencil and Bontex, he begins tracing the guitar. After tracing, he factors in the amount of space needed between the guitar and the case and what materials he might use between the guitar and the leather. “I decided I wanted about a half an inch of foam rubber on each side of it – all around it, so I added another half inch for that. Then I added another half inch for incidentals.”
Denny glues the gusset to the base
Of course, the guitar has to fit inside of something, so there’s the matter of the gusset – the piece of the case that connects the top and bottom. “I had to measure how deep the guitar was and I was also gonna have some foam above and below it so I added [the guitar depth] plus a little bit for good measure.” Denny opted to use foam from our store – all of which are about 1/4″ thick.
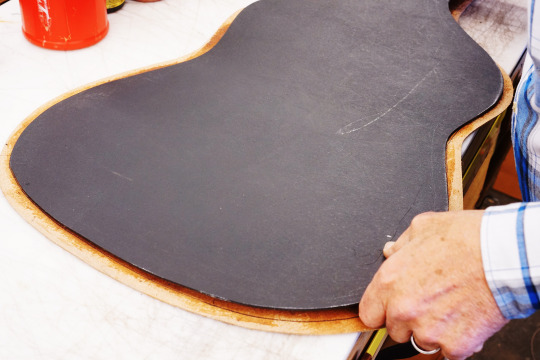
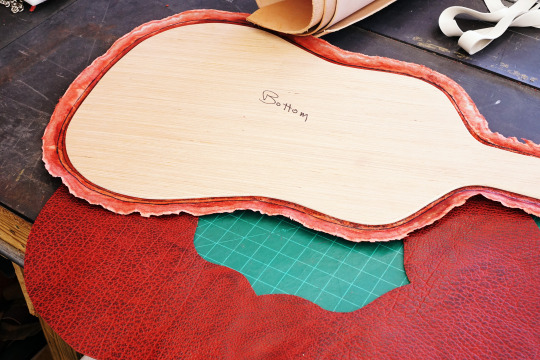
After getting patterns for both traced, he cut them out of Bontex and set to work. He opted to make the pattern for the lid of the case after he got the structure of the bottom complete – he originally thought this would improve the fit, but later found that this method made things harder. Next time, he says, he’ll fashion the lid by reusing the pattern from the bottom of the case and simply add more space all around.
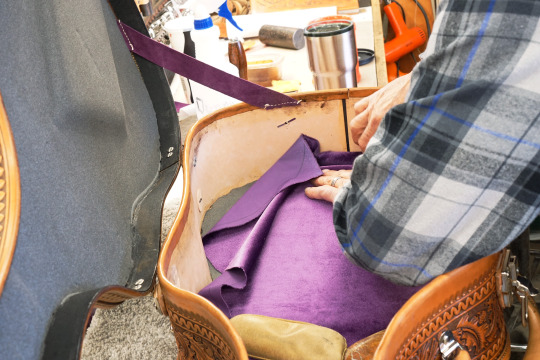
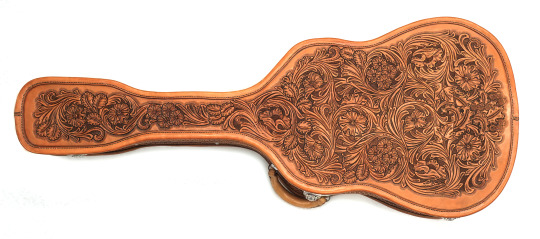
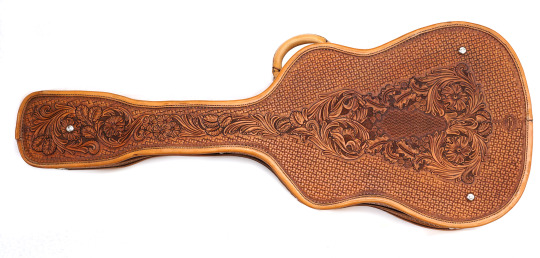
After getting all of the patterns made, Denny cuts the shapes out of leather – just like you’d do with a purchased pattern. Denny knew he wanted to tool his piece, so the leather was easy to choose: Hermann Oak veg tan in 6-7 oz. He also made choices about other materials during this time. He would use Kydex as a stiffener for the top and bottom and line the case with velvet.
Designing the Case
Tooling, fitting and alterations
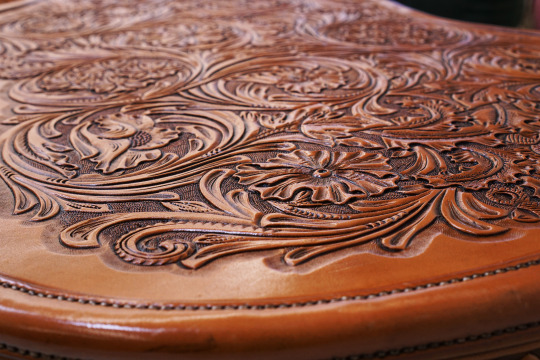
Once Denny has his leather cut out and tested for fit, he begins tooling. For this project that element was, by far, the most time consuming part.
His design approach for tooling is more spontaneous than the rest of the pattern. “I just start drawing flowers on it. There are no patterns for that, so I make something from scratch. I just make something that pleases the eye.” He says that this project put him to the test because of its size. “This was the biggest piece of leather I ever tooled. A saddle has a lot of pieces of leather but none of them are that big. A lot of design had to go into this case – there was a lot of space to fill.” He says that moisture wasn’t an issue for this piece, he just added water as needed and made sure to tape the pieces to prevent stretching.
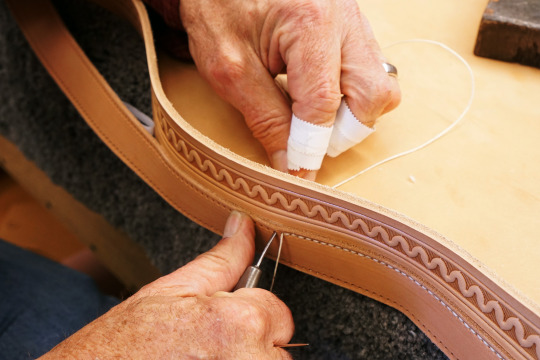
Once the pieces are fully designed, Denny tests things out once more before permanently bringing them together with adhesives and sewing.
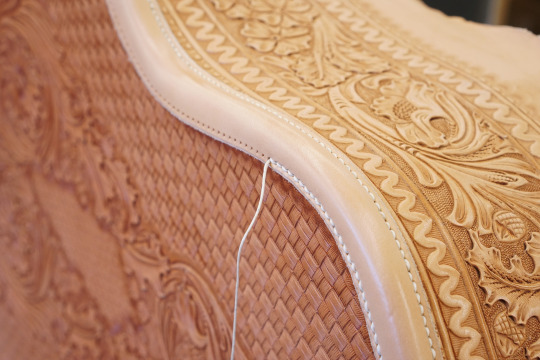
For this guitar case, Denny realized he made a mistake cutting out a piece and had to rethink his sewing approach. “I originally started out with a French box stitch which is an angled stitch that goes through both pieces of leather. I made a mistake when I was cutting it so I couldn’t do that.”
Denny said that misstep doubled his stitching time. “I would have had to hand stitch all the way around to begin with but I would have just had to do it once.” To put that into perspective, instead of hand stitching for 56 inches per piece (both lid and base), Denny had to stitch 224 inches. That upped his band-aid budget.
Still, he wouldn’t call it a mistake. “I never make mistakes, I just make more expensive products. That’s kinda what it turns into. It’s the same cost for the customer but it’s more expensive for me. To make or to do things that are mis-engineered and have to redo them or just make them work costs time and money.”
Denny had to weigh his options when it came to the hand stitching fiasco. He estimates that he put about 150-200 hours into this guitar case and that over half of that time was spent tooling. His choices were to redo the tooling or suck it up and stitch some more.
“I put a lot of time into tooling and I made a mistake cutting an edge to stitch [the case] together, so was I supposed to scrap that deal that I worked a week and a half tooling? Or do whatever it took to make it work? Every crafter is going to run into that situation. It’s like a carpenter or any kind of a craft or skilled laborer. You have to make things work because theory is different than practice every time.”
He says that pattern makers aren’t the only ones who must face this reality. “Patterns help but even that doesn’t solve every problem because materials are inconsistent. Especially a natural material like leather. It’s not like plastic poured into a mold. Some parts are soft, firm, stretchy, some are stiff – so you run into a lot of problems and you can’t match everything perfectly. You have to make them match. ’Course sometimes, you have to scrap it, but most of the time, you can salvage it.”
Once Denny had his strategy settled, he began stitching his days away. Once he had everything stitched and all of the materials put into place, he just had a few more tests to do. During this time, he made a few adjustments like changing the velvet interior color. In the end, he ended up with a pretty satisfactory product, but it wasn’t pattern-ready.
Pattern-ready
New methods, materials, and plans for the future
While Denny feels that his guitar case is good enough, he doesn’t think it’s refined enough for people to emulate- plus, he has a few bones to pick with his material choices.
The guitar case he produced was heavy. He estimates it’s about 20-25 pounds as it’s essentially made from two sides of leather. Still, he says, the weight isn’t his main motivation behind giving this project another go. “The one I made is usable and I love it, but the pattern needs to be refined.”
He says that his current pattern is too difficult to make decent instructions for. Hand stitching aside, he says that some of his design choices like making the top of the case last and using Kydex as a stiffener for the gusset cost him a lot of time. This was especially true when it came to shaping the top of the case as there was nothing solid to easily mold the shape from.
“I ran into a problem when I was shaping the gusset [trying] to get it to look the same on both edges. The top was just loose. I had to hand shape that and I ran into some problems. I’m thinking next time I’ll build a form. Then I can shape the Kydex around it.” Though, he admitted, he wasn’t exactly sure how he would pull that part off. The Kydex, he added, didn’t turn out as stiff as he thought it should.
For his second case, he’ll opt for a thin plywood instead. He says that this should give him the strength and flexibility that he was looking for while also cutting down on the overall weight.
He also wants to reduce the production time for his second attempt. Skipping the tooling will cut his project time nearly in half, but he’s thinking of more ways to get his time down. To do that, he’s focusing on the second most labor intensive step: stitching. “For the next case, I can machine stitch half of it. I don’t want to cut a corner, but I want to do something that’s a little simpler.” He says he isn’t quite sure how he’ll machine stitch some parts, but he’s putting some thought into it.
He also plans to cut the top of the case out using the pattern from the base. “Biggest challenge is getting the top to fit the bottom. I worried about that all the way through, because I built the top last. Next time I’ll build them at the same time.”
Finishing Touches
Turning a finished product into a pattern
We mentioned earlier that Denny doesn’t do these patterns alone! Though he designs them and even cuts out the original pieces himself, someone has to convert those lovely ideas in a cohesive product for our customers. Elizabeth, a member of our Research and Development team, checks in with Denny throughout the process and documents each step with photos and notes. Denny keeps track of the process in his head, so it’s up to Elizabeth to put everything on paper. After that, Elizabeth matches up photos and notes to develop instructions. Sometimes she even converts the photos into drawings for clarity. During this time, she checks back in with Denny to make sure that the instructions work. This is often when, she says, they add optional steps so that customers can make something unique. The Bontex patterns that Denny cuts out are scanned and converted into convenient outlines that are later specially printed so that they come out the actual size of the product. Once all of that is done, Elizabeth creates the packaging, names product variations, writes the product descriptions and makes it available online.
Product Reflections
Denny’s thoughts on making patterns and pricing his work
After explaining his process, Denny had a few more thoughts to share. He says that his favorite part of developing a new pattern is seeing how it turns out. “When you’re making a brand new pattern, when you’re thinking about it and it’s a lot of fun. Then you start trying to make it work and it’s not much fun. But, when you get to where you can start putting the pieces together and see what it actually looks like, it’s pretty fun! ‘Cause sometimes it comes out pretty good – it never comes out like I think it’s gonna come out, but it always comes out pretty well.”
Though Denny doesn’t sell many products himself these days, he does like to think about what price he might charge for it. “If you ask me how much money I’m gonna make on it, the answer is $0. Considering the amount of time that’s in it and it’s sort of a unique product, I would say about $7,000 is what it oughta sell for. Without tooling, [the price] would decrease by more than half. If someone with a big name made that and not necessarily any better, I would say $10,000-$15,000 is what it would go for. It’s like a Louis Vuitton purse, the unknown craftsman’s is worth $1000 and [Louis Vuitton] is worth $3000.”
What’s Next
Finishing the pattern
Even though his case is done, the pattern process hasn’t ended. All that Denny can do is get cracking on the next iteration! He already started and he’s using some of our brand new shrunken bison! You can check out Denny’s progress by following us on Twitter, Instagram, Facebook or Pinterest.
If you’d like to see more of Denny’s patterns, check out our website. You can also see some of Denny’s work in our retail showroom!