Tap your way to stunning design with this quick and simple method of stamping leather. Tap-off designs combine the ease of carve aids with all the details you’ve added to a pattern to make it unique. The best part about this method is that excellent design is a stone’s throw away and could be as cheap as free-99!
So, grab your scrap and give this method a try after getting some advice from our resident master craftsman, Denny Lowe.
Why Use a Tap-Off?
Tap-off patterns are reusable patterns that you make yourself. They give you the option to consistently reproduce work that is unique to your style, taste and specifications. They’re also a quick way to get started on an elaborate tooling project or to just…make an impression. Unlike craft aids, the tap off pattern will press the design into the leather instead of just the outlines.
Supplies
The supply list for this is pretty simple. Of course, you’ll need to use whatever tools your project calls for when it comes to adding all of the detail, so we’ll keep this list simple and only include things you need to make your pattern and press it into other leather.
– Leather – Spray Bottle of Water – Hammer or mallet – Carving Knife – Punch/Rotary Punch (optional) – Design or Pattern – this can come from your imagination or an actual pattern
Making a Pattern
Check out this throwback video of Denny and Kevin talking through making and using a tap off pattern. Keep reading for a text breakdown of the video!
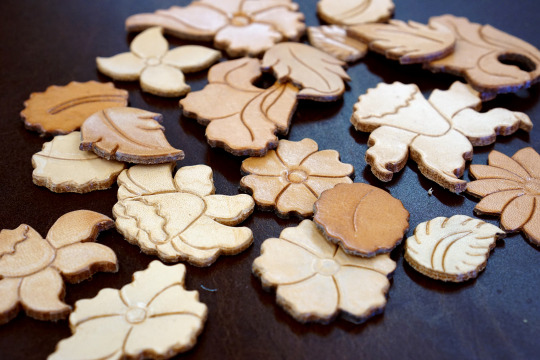
Making a tap-off pattern is as easy as carving! You can use a pattern or craft aid to guide the design of your tap-off, or you can do it freehand. You can also use another tap-off pattern or unorthodox materials that will make an impression in your leather!
Denny recommends using a firm piece of 8-9 oz leatherand dampen it well. The exact amount takes some practice, but keep in mind that you’re going to be making deep cuts and the wetter the leather, the easier it is to sink your tools into. Of course that doesn’t mean you should soak it, so add water gradually as you work.
Use your pattern, craft aid or tap-off to make an impression and use your swivel knife to carve out your design. You’ll want to carve pretty deep into the leather.
Pro-tip: when using a swivel knife, watch where you’re getting ready to cut – not where you already have.
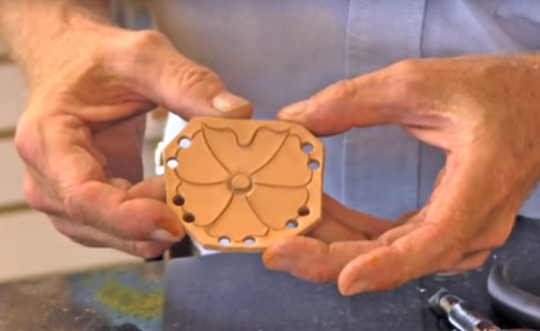
Cut your pattern out of the leather piece. If you want to clean up some inside curves, leave some space around the edges. Denny left 1/4″ around the edges. You can use a rotary punch or just a regular punch to perfect the curves. This will help make your imperfect knife work a little closer to being perfect. Place the punch just inside the curve you’re looking to refine and go for it. The size you’ll need depends on the pattern – or just skip this step altogether.
Use a utility knife or a lacing chisel like Denny to remove the extra leather around the edge. Be sure to use a hard surface underneath like a poly board or rubber on top of granite or marble.
Once you’re done, use a clear coat of some kind to waterproof it and keep it firm. It will stop the leather from expanding and wearing down. This is ideal for using scrap.
Denny Tip: While nothing is perfect, take your time and get them as nice as you can since you’ll be reusing them.
You can also make detailed tap off patterns, but keep in mind that your tapped pattern will be a mirrored image.
Using Your New Pattern
This is the easiest part of the process! Just wet your leather and hold your pattern down. Then use a hammer of just about any kind on a hard surface and tap away!
Thanks for reading folks! If you have any additional questions be sure to use the Inbox button at the top of this page or use the form on our website to get an email from Kevin, Denny or one of the other fine professionals from SLC. Until next time!
If you’re anything like me, you might have trouble when it comes to identifying an alligator…or was it a crocodile? These water-loving reptiles look strikingly similar and can be tough to name. While it may take careful consideration to distinguish between them when they’re alive, they can be even tougher to ID in leather form.
That is why we spent this week diving into the world of crocodilians and unearthing the secrets behind recognizing their leather.
Wild Distinguishment
We get nerdy about live crocodilians
First, let’s get the obvious part out of the way. Being that crocodiles, alligators and caiman are all reptiles, they all share distinct reptilian features like scaly, armored skin and long, low bodies with tails that are great for the amphibian lifestyle.
Now that that’s out of the way, let’s chat about the classification of crocodiles, alligators and caimans. To start, they are all part of the same Order: crocodilia. While they may look the same, they are different enough to be split into two families: Alligatoridae and Crocodyloidea. Caimans and alligators belong to the same family, though they are split into different subfamilies that are very similar to their common names. For that reason, alligators and caiman are often grouped together when discussing physical traits – just like we’re going to do in this post. Their leather is pretty different, but we’ll get to that part later.
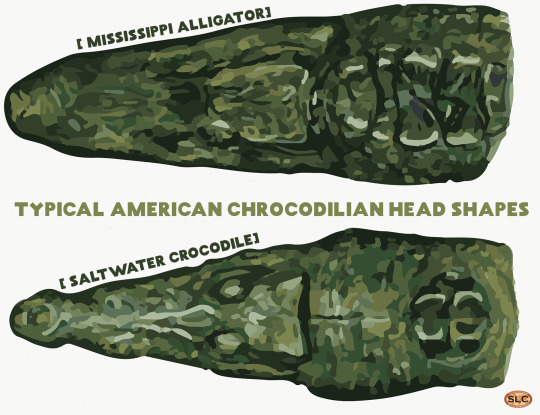
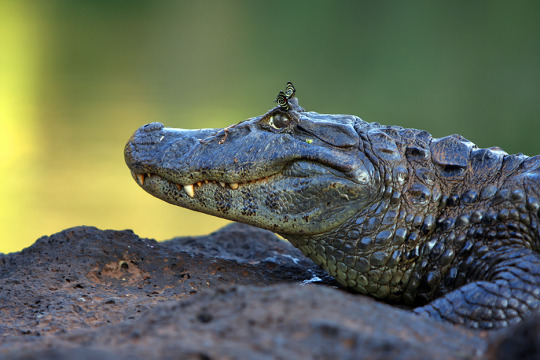
So we’re still going the science route, but this part is less stuffy. Do you know how to tell the difference between an alligator and a crocodile? A lot of folks will jump to head shape. Crocodiles tend to have a thinner jaw, while alligators (and caimans) have a wide jaw. While this test is a fairly safe bet when discussing American crocodilians, it doesn’t apply to them all. There are crocodiles and alligators with both head shapes.
Some folks will note size, as caimans tend to be smaller than both alligators and crocodiles.
It’s important to note that size is not necessarily indicative of genus or species as crocodiles and alligators are not born gigantic. So, just like head shape, this rule doesn’t apply across the board and should not be the lone factor in identifying crocodilians.
The best way to tell the difference is by looking at two things: the setup of the jaw and little bumps called Integumentary Sense Organs or ISOs.
The way alligatoridae’s jaws are setup has a smoother look. These guys sport an overbite, much like us. It makes only their top row of teeth visible when their mouths are closed and gives them a look akin to a smirk. Crocodiles have a bite that rests their teeth right on top of each other so that both rows of teeth are visible with a closed mouth. As a result, their mouths look jagged and more dangerous than smooth-jawed alligatoridaes. While this difference is perhaps the easiest to spot, it’s not at all helpful when talking about leather because teeth are removed during the tanning process.
A caiman shows off its overbite. Doesn’t it look like a cheeky smile?
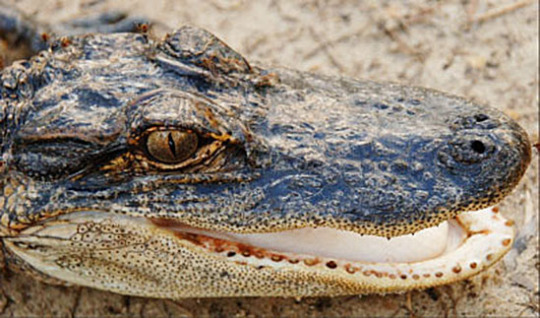
The final distinguishing feature is the location of ISOs, little sensory-detecting bumps that make crocodilians truly formidable opponents. These ISOs make heavily armored crocodilians more sensitive to movement and touch than human fingertips. While all crocodilians have ISOs, only crocodiles (and the nearly extinct gharial) have them all over their bodies. Alligatoridae just have them on their faces. ISOs are absent from the top of the head of all crocodilians. These bumps can be tough to see after tanning, but pronounced ISOs are easy to spot.
See the little black dots on this croc? Those are ISOs! Image via Vanderbilt.edu
Leather Differences
Now that you know about the wild side of things, let’s get to the material
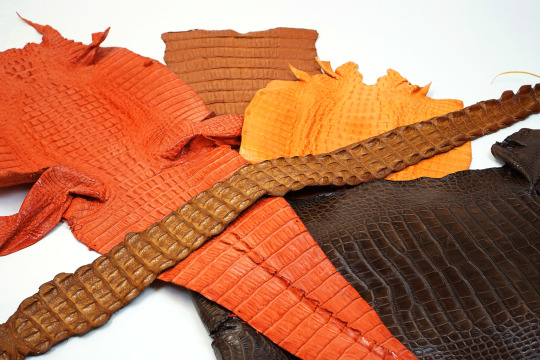
So, you know the basic way to spot the difference between alligatoridae and crocodyloidea, but what’s the situation with leather? From here on out, we’re switching to street names and we’ll stop grouping caiman and alligators together.
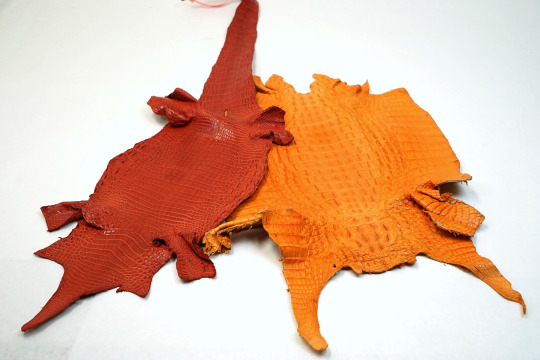
Why? Well, it may surprise you to learn that when it comes to leather, alligator and crocodile are very similar. It turns out those alligatoridae family members are not as similar to each other once they’re tanned.
These wee little things are crocodile, though many SLC staffers ID’d them as caiman at first. IDing was tough because ISOs were not easily spotted either. We used some of the tips below and had some help from the tannery.
All of these animals are pretty darn similar after they’re tanned, but there are three key factors that will help you ID your leather.
ISOs
No, this leather doesn’t have acne
We talked about ISOs earlier in this post. These little bumps, that sometimes look like blackheads, are found on all three of the reptiles in question, but only crocodiles have them all over. While some tanning practices can render ISOs virtually invisible, some tanners keep this distinguishing feature in tact as a sign of authenticity. You can still find ISOs on alligators and caiman that have their facial features left in tact.
Notice the darker, pimple-like marks on this alligator piece. Those are ISOs. This section is the side of the alligator’s head – think of it as a cheek. They can be tough to see, but are notably missing from the rest of the skin.
ISOs aren’t always around when you’re trying to identify leather, but if you can spot them all over, you know you’re rocking with a crocodile.
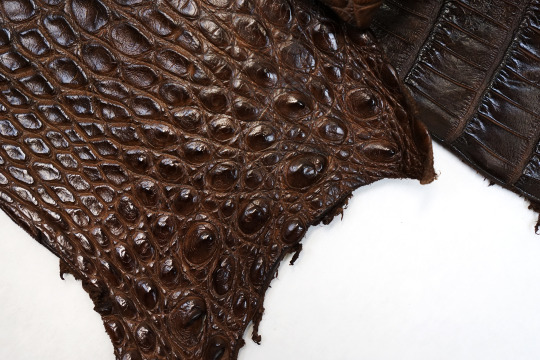
Pliability
With great softness comes a great price tag
You can rank our crocodilian friends based on value that is determined by one major factor: workability. When it comes to leather, ISOs aside, crocodiles and alligators are actually more similar to each other than caiman. This is not because of size, but because of their rigidity or hand.
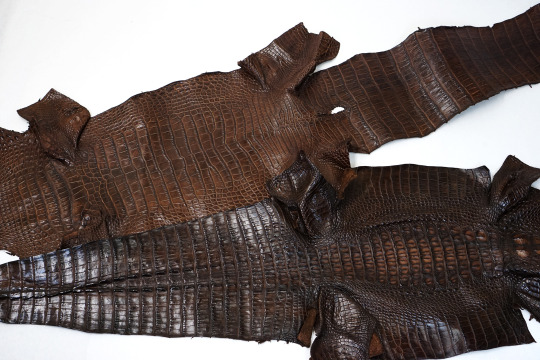
The back and belly of an alligator. Notice how this leather doesn’t lay as flat as a lot of the caiman we have pictured. It’s due to the softness and size of these pieces.
Caimans have calcium rivets in their scales making their fibers denser and more rigid. That rigidity causes caiman leather to be a bit tougher to work with. While the degree of rigidity is partially determined by tannage, caiman spinal scales will pretty much always be tougher than those found on alligators and crocodiles. For that reason, caiman will often sport a much lower price point.
Crocodile is in the middle of this heirarchy as it is more pliable and easier to work with than caiman, but not as soft as alligator. Crocodile leather will be priced pretty similarly to alligator for this reason.
Of course, that puts alligator at the top of the list with the most workable skin and the highest ticket price. Alligator is also easier to tan, so you may find that they have a more consistent color and finish.
Caiman Complexion
Something we’ve noticed
We gathered just about every iteration of caiman we could find in our warehouse. From full skins to tails large and small. We even found some spines! While it may be tough to spot, nearly every piece of caiman here has a different hand to it.
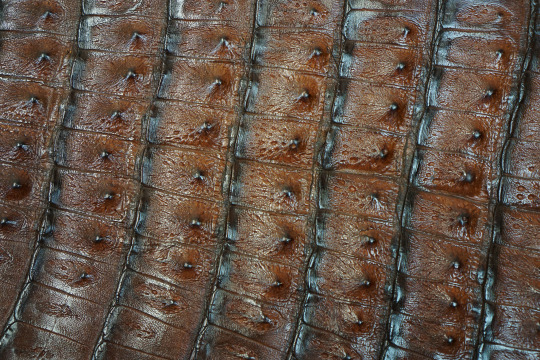
One thing we noticed when working with caiman is that it’s easily identified due to some mysterious little markings on their scales. They may be tougher to spot on the belly, but they’re visible on just about every surface of a caiman except for their sides.
Notice the pore-like dots on these scales? Not the dark marks, but the small groupings of holes. They almost look like feathers plucked out of a bird or a bad skin day. This is a feature we noticed on all of the caiman pieces we had and couldn’t find them on any crocodile or alligator. Unfortunately, we’re not aware of any scientific jargon associated with these marks, so we’ll just refer to it as complexion.
In Short
A quick recap for those in a rush
A crocodile spine
If you want to know what leather you’re dealing with look for ISOs, check price and pliability, and check your leather’s complexion. If you’re lucky enough to come across a tannery sticker, the work’s been done for you!
The truth is, IDing this leather can be tough, even when you have each kind in front of you. But, with a little practice it’ll all come together.
If you’re interested in learning more about crocodilian leather, be sure to use the links provided throughout this article.
If you want to purchase some crocodilian skins from us, please visit our website or visit us in-store where our selection is wider. If you have any additional crocodilian leather facts or questions, please use the Inbox button at the top of this page or send Kevin an email by filling out the form on our website.
Really, there is no “best”, as the right leather depends totally upon your end goal. Popular moccasin leathers tend to be soft, pliable and strong. That’s why many people lean toward bison or soft veg tan. Personally, I like elk or buffalo, depending on the style, and in some cases, I’d even prefer an oil tanned cowhide. The best way to find what’s right for you is to settle on the look and feel you want for your moccs and do some research on different leathers. Some will offer more stretch than others, which some might be more abrasion resistant. Happy hunting.
We don’t really “grade” leather, so you won’t find a chart on our website. The tanneries grade the leather that they sell us, and we forward the customer those grades.
Our “top” grade of import is an A/B selection, and our Medium is a C grade selection.
As for Hermann Oak, we sell their B grade, and what we call a Craftsman Grade, which corresponds to their D grade.
With that being said, you might want to consider how leather is graded at the tannery. Many are not aware that leathers that come out of the tannery are all basically the same quality, because they are all tanned in the same pits or drums. What determines various grades, is the number of cosmetic issues on a side or hide. For instance, if a side of Hermann Oak has a very ugly large brand right in the center of the side, with the rest of the side being just fine, that side could be a D grade. But if you cut the side in half, and you cut right thru the brand, you’d have two half sides that could easily be “A” grade.
That is precisely why we sell more Craftsman Grade leather than any other leather. People have learned to work around and with surface issues. Import leathers are simply different than domestic leathers because of the tanning process itself.
For more information about buying leather, browse this blog or check out our FAQ. We provide detailed information about different leather types, cuts. weights and buying methods.
The answer is not as mystical as you might think and the tool is one that’s easy to come by. They used a stitching groover to make, well, a groove. Then they simply rolled an overstitch wheel down that groove. Easy peasy!